How to make sections on Pinterest – If you want to create a section on your Pinterest board and don’t want how to add a section on a specific board,
then read this post completely, I will share the step-by-step guide to create a section on your Pinterest board within a few minutes.
Sections are really useful for organizing pins perfectly on your board, you can give different names, and keep different pins on sections.
Read: How to change cover image on a board
You can keep different types of pins on your section, and organize your board beautifully, If you don’t know how to make a section on Pinterest then,
Below I share the step-by-step process to create a section on your Pinterest board.
How to Make Sections on Pinterest
To create a section on your board you need to follow these steps below –
1. Go to the board section
Firstly you need to select the board on which you want to create a section,
2. Click on the plus icon
When you visit on board section, the next step is to click on the plus icon that appears below

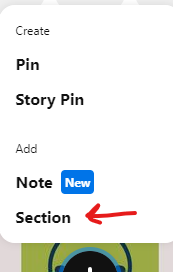
3. Click on the “Section” option below
When you clock on the plus icon then you can see many options there, you need to just click on the “Section” option

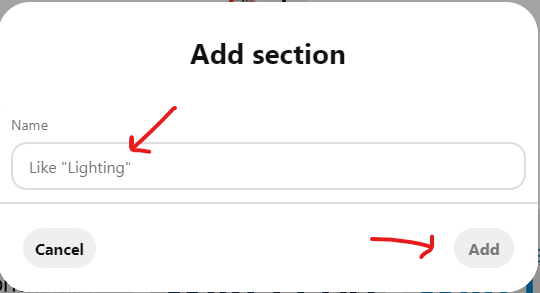
4. Enter your section name
After clicking on the section option, then finally enter your section name and click on the add button, that’s it you have created successfully a section on your board, When you upload pins on Pinterest then select this section and upload Pins.

Conclusion
You can create many sections like this, on every board you want, If you like this quick guide then follow our social media handles and subscribe to our newsletters to get more stuff like this. Follow our tech review profile on Pinterest – Techotn.

